
Having worked tirelessly to provide web hosting, email, file storage, and a myriad of other features for my business since its opening in 2009, our small server had been showing signs of its age – five years is a good lifespan for mission-critical hardware. Though we believed it still had years of service left in it, the time was right to upgrade to a more robust platform on which to base our business.
This article and a follow-up will chronicle the choices made in hardware and software, the reasons why, and the construction and configuration process. We don’t expect our average reader to build their own server, especially for a core piece of infrastructure, but wanted to show the kinds of skills that translate well from being a computer hobbyist to being an IT professional.
Choosing the Right Hardware
This entry will focus on the specifics of our choice in hardware, the particular options we selected, and the role each piece plays. While software can be easily upgraded, improving or adjusting the underlying hardware is a much more tricky process, requiring careful planning, the purchasing of sometimes out-of-production components, and a great deal of in-OS configuration. It is therefore so essentially necessary to keep a long view when selecting hardware and to budget accordingly — spending more now could save hundreds or thousands in administrative costs down the road as well as greatly extending the useful lifespan of the equipment.
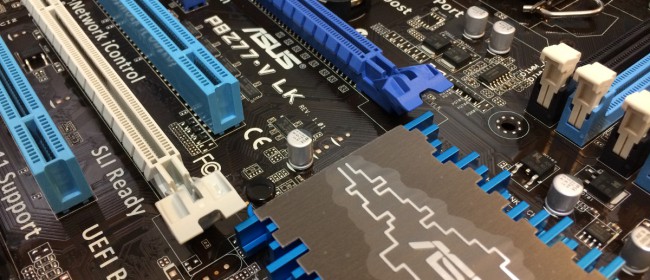
First Component: the Motherboard
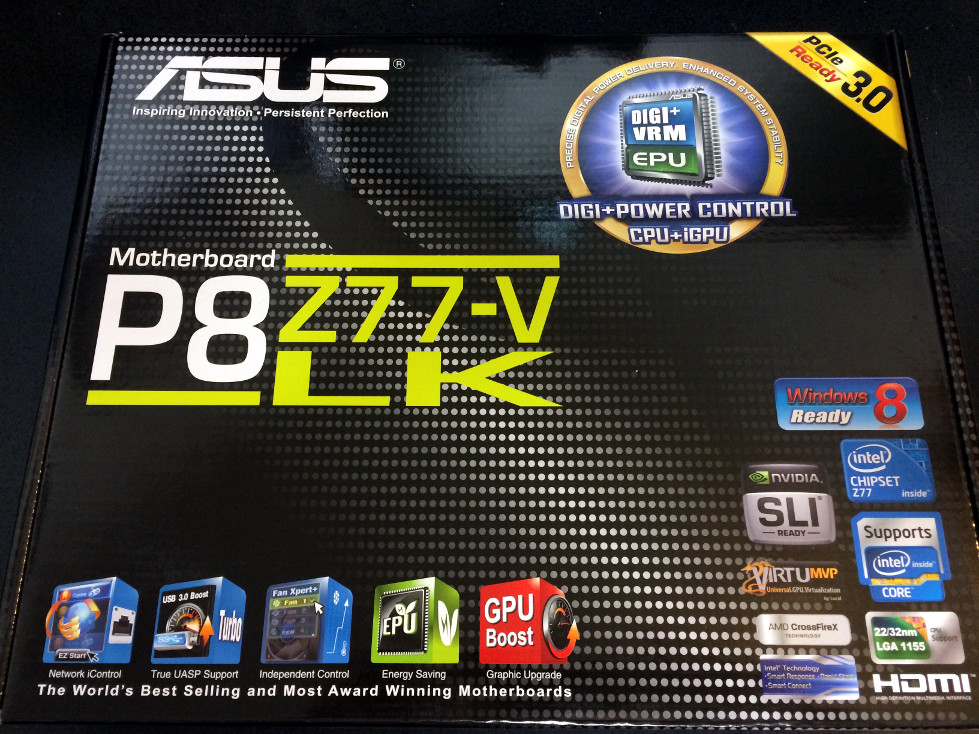 The choice of motherboard is an important one, for every other piece of hardware purchased will be bound by its limitations; the board you choose will in a very large way dictate the rest of your server’s hardware.
For our new server we looked at boards from known and reputable brands with whom we have had positive experiences. Immediately we thought of ASUS, and found the P8Z77-V LK to be a board that combines the stability we required with the expandability we desired. Supporting the latest quad-core Intel i7 processors and up to 32GB of RAM, this board was an easy choice especially when backed up by so many positive reviews on sites like NewEgg.
Though we weren’t expecting to fully utilize the board with our initial build, being able to add additional RAM and add-on cards if desired made this an attractive board.
Second Component: the Processor
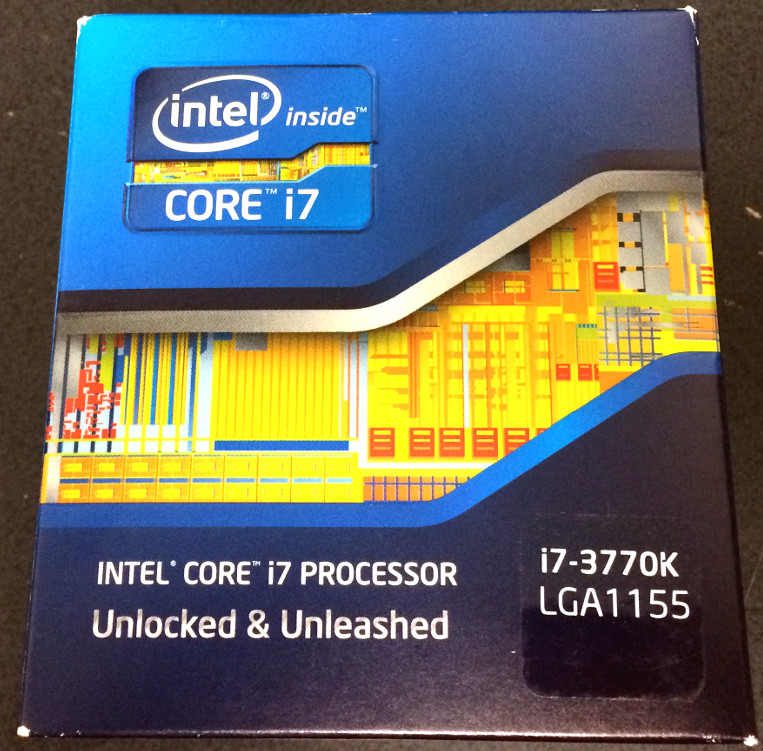 Following closely on the heels of our motherboard choice we looked to processors, the literal brains of our server. Most enterprise applications are coded to utilize more than one processor core to distribute the load of resource-intensive operations, which lead to a discussion of the desired number of cores. Very briefly considering a six-core system, we were bound both by the socket type on the P8Z77-V LK (LGA 1155) and the fact that six-core processors are prohibitively expensive.
Looking at Intel’s enterprise-grade offerings we knew instantly we were shopping for an i7 processor. Faster and more reliable than their i5 brethren, the i7s have had a long track-record of success in our various desktops and test servers. Gone are the days of speed being king, as measured in raw MHz, and so we settled for a mid-range 3.5GHz processor which could be clocked up to 3.9 if we really wanted — we certainly won’t be overclocking our server however.
Third Component: Memory
The Intel i7 we selected had an optimal maximum bus timing of 1600, meaning for best performance our installed RAM had to match. Our motherboard supports up to 32GB, 8GB per slot, and to ensure we would be able to upgrade the server in the future we decided on a 2x8GB configuration.
RAM is less finicky than it once was, making the choice of brand less important. Of the major players we have had positive experiences with Crucial, Mushkin, Corsair, and others. For this server we decided on Corsair “Vengeance” memory based on the strong recommendation of other IT professionals. By far the most important step in the RAM selection process was the noting of CPU timings and optimal frequency, allowing us to ensure the best possible performance from our memory.
Fourth Component: Hard Drives
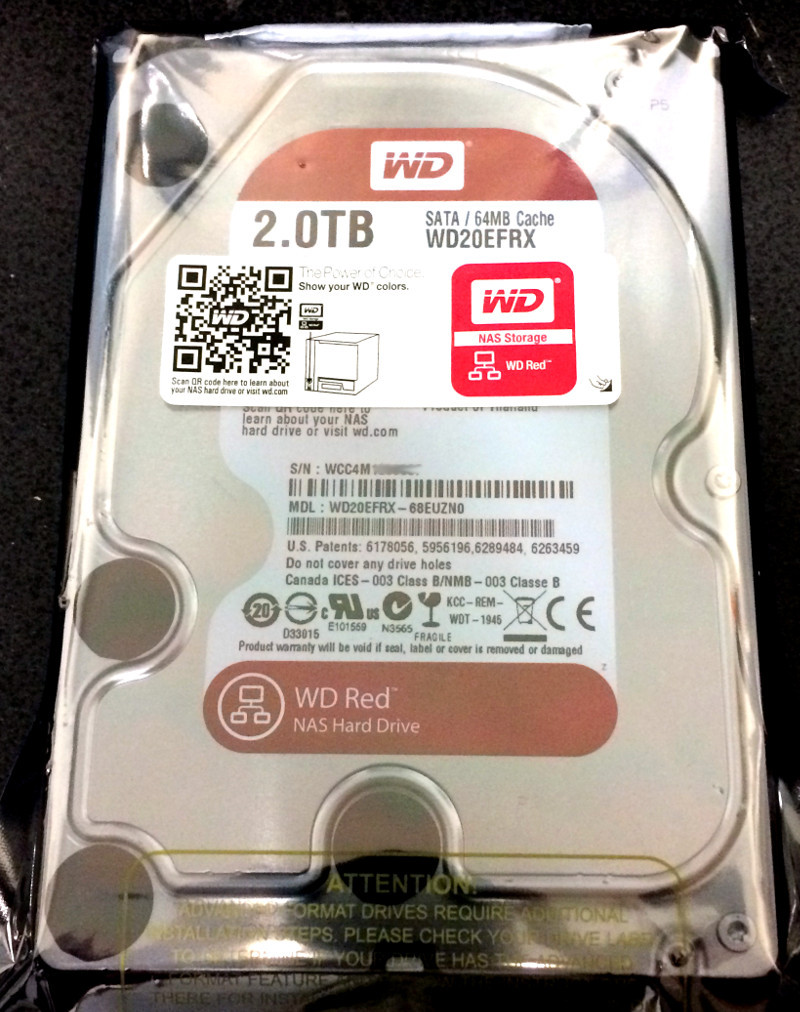 Since this server will be used both for network services and file storage, including several databases that help operate our business and that of select clients, storage space is key. Originally considering 1TB drives, after noting the minimal price differential between 1TB and 2TB drives we decided on the larger storage space. Again, that attention to the longevity of the hardware when it comes to purchasing equipment now.
Though the number of companies offering hard drives is relatively low, the sheer amount of options when it comes to physical storage media is staggering. We ultimately chose the Western Digital RED drives based on the recommendation of several enterprise-level professionals who deal with hundreds of hard drives on a weekly basis. These drives are specifically designed to be used in a network-attached storage (NAS) array such as we are planning for our server.
While these drives come highly-recommended we were worried about the large number of dead-on-arrival drives that were being reported by the IT community at large. There didn’t seem to be any problems with the drives once they proved operational, but somewhere in the manufacturing process something may have gone wrong with a batch or two and as a result many drives are inoperable. Since our server is not needed immediately and we have time available in case a drive does prove defective, we decided to go ahead and order the drives. We purchased four of them, allowing us to configure a 4TB RAID-5 set-up with a hot spare in the event of future drive failures. More on the specifics of this configuration in a later post.
Fifth Component: RAID Card
RAID is 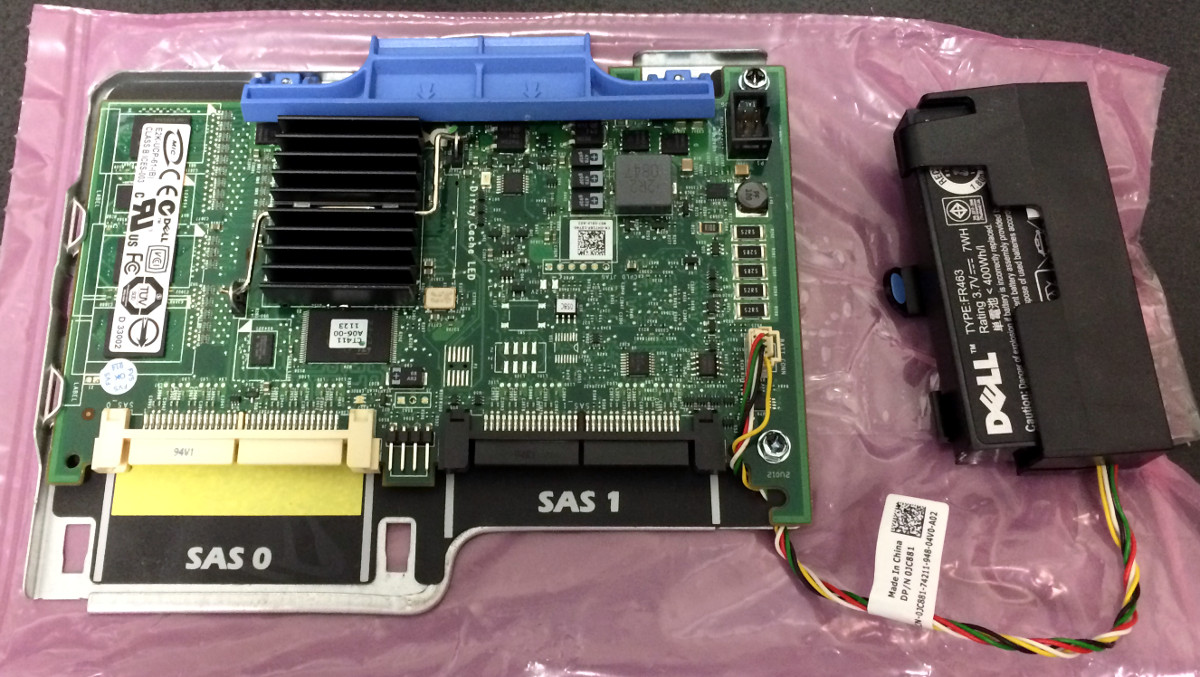 the process through which multiple disks can be linked together to form a single large or redundant drive, providing increased speed and reliability, and is an exceedingly common feature in any business server. While most modern motherboards and processors can configure and maintain RAID setups, to reduce resource overhead and increase the options available to us we decided to invest in a hardware RAID card, which frees up the processing power and memory required to run such an array from the main system.
The Dell PERC line of RAID cards has been a time-tested workhorse in business rackmount servers and so would be perfect for our needs. We are using the PERC 6/i, taken from a decommissioned 1U, picked up from eBay on the cheap. We had to make sure that our RAID card would handle the 2TB drives we had planned to use, and luckily the Dell 6/i perfectly fit the bill.
One issue that came up in our investigations was that the PERC cards placed in desktop servers tended to have overheating problems. This is most likely due to rackmount servers being forced-air systems, with many small fans keeping a constant supply of cool air running over every component. In a non-racked server this airflow isn’t present, causing heat build-up. To alleviate this issue we had custom heat sinks and specialty fans ordered that we could use to provide adequate cooling to this very important piece of hardware.
Sixth Component: the Power Supply
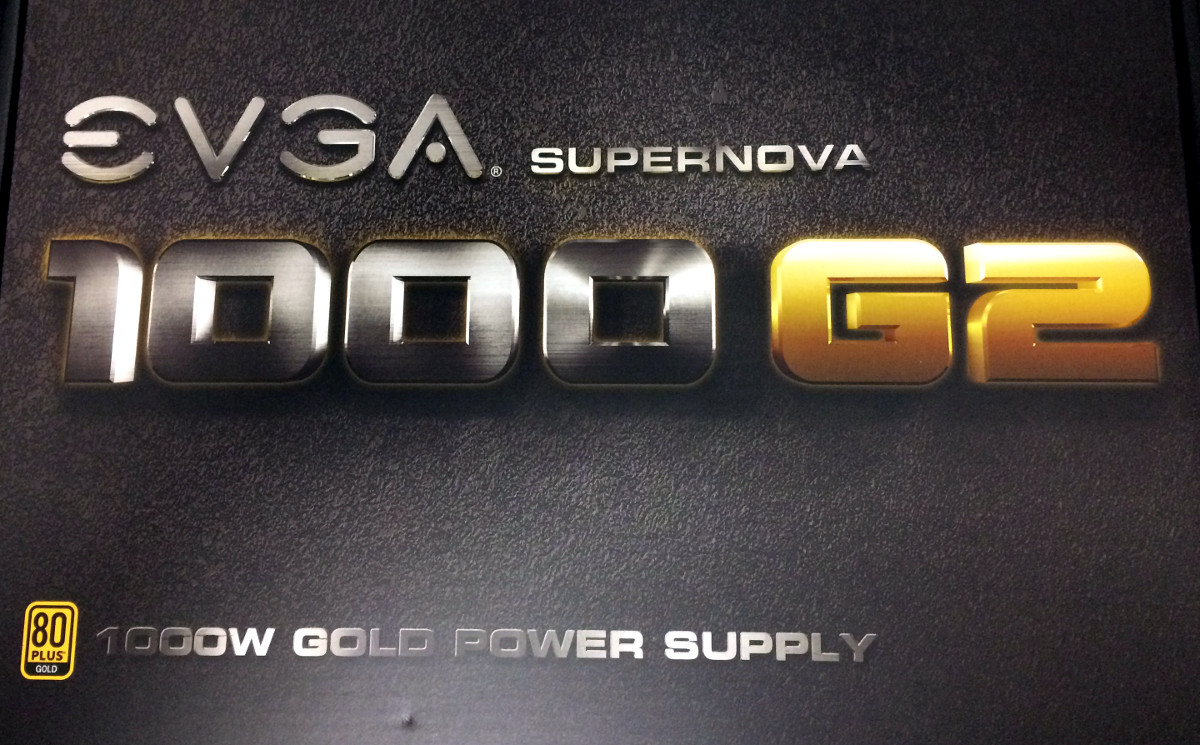 Another critical piece of hardware, the choice of a power supply unit (PSU) was not easy. Many companies have branched out and entered the PSU market, flooding the field with models and devices that run the gamut from exceptional to horrifying.
Power supplies are rated from “Titanium” to “Bronze” based on the efficiency of the unit; the more efficient the power exchange the less power is wasted as heat and the less expensive the device will be to operate. While not a serious concern for desktop workstations our server will be operating night and day for the foreseeable future, much as our existing server has done. Both to reduce power consumption and to assure quality, we decided to look only at the “Gold” or “Platinum”-rated devices. “Titanium” units were nominally out of our price range and by and large seemed designed for specific or specialized applications.
After reading many reviews of the available units in our desired range on [H]ard|OCP and Tom’s Hardware, both well-known to us from our years of system tweaking and pushing hardware to its limits, we decided on the EVGA Supernova 1000. 1000 watts is certainly going to be overkill for our server, but we wanted to be sure that should we need to expand the server’s capabilities in the future we wouldn’t need to purchase another PSU.
And the Rest: Miscellany
 Several additional items were purchased to round out our system, including a simple Lian Li case, known for durability and low-weight. We didn’t need flashy lights, large windows, or built-in water cooler radiators as are common in many designer or gaming machines; this was going to be a workhorse that lived in our small office rack. A key feature however was that we required at least three external 5.25″ drive bays and a number of fan mounts. The latter would allow us to control the airflow through the case, expanding it as necessary. Our choice of the PC-9F also allows us to remove the internal drive bays to provide additional airflow options.
The multiple external drive bays were needed so we could use an Icy Dock hot-swap drive caddy, allowing us to fit four 3.5″ drives in the three external slots. By using a hot-swap system we could not only check drive status at a glance but also, should occasion require, replace a failed drive without powering down our server.
What’s Next?
Once all of the components are delivered to the office we will begin constructing the server, testing each component, and modifying the RAID card as discussed above. We will have a full breakdown on each step with pictures and perhaps videos of the process, including any surprises or snags that happen. Until then, thank you for following along as we work to improve our capabilities!


