

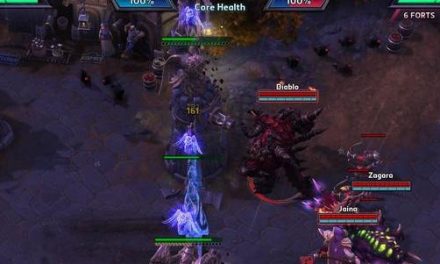
As part of the 1.0 official release of Risk of Rain 2—a roguelike item-based shooter by Hopoo games—the developers added a final boss to the game, one who has caused endless derision and clenched fists across the internet. Collecting items is a core mechanic of the game, including those which increase your personal survivability as well as delivering lethal damage to your many foes. Mithrix, the exiled god-like entity who holds dominion over the moon of Petrichor V, turns the tables on players by stealing all of their hard-won items and using them against the heroes.
Each character in Risk of Rain 2 has unique abilities. The commando has the fastest rate of fire in the game, which makes him perfect for triggering on-hit effects such as bleeding. Rex can sacrifice his own health to empower attacks. Loader swings through maps with a grappling hook, doing frightening damage with her fists. And so on.
The engineer is a character defined by the use of his personal sentry turrets. Two turrets are deployable at a time, and they help provide a great deal of cover fire for a character which doesn’t have any innate movement or defensive skills. What makes these little friends truly unique however, is that they spawn with a copy of each of the engineer’s items. If the engineer has an item that can deal bleeding damage with each shot, the turrets will likewise have this ability. While very slow to ramp up in power, this key characteristic can make the engineer a neigh-unstoppable powerhouse as the game progresses.
Much of Risk of Rain 2‘s difficulty stems from the fact that enemies grow and evolve as each run continues. Starting from zero each time, the player must carefully weigh the potential value of finding more items versus the ever-ticking clock. As time goes on not only do monsters get more health but increasingly difficult and unique monsters will spawn, looking to make quick work of an unprepared character. Most runs end when the hero gets rag-dolled across a map by enemies too powerful to stop.
Today I endeavored to try and beat the boss Mithrix on the game’s highest difficulty—Monsoon—with my favorite class and his little automated friends. I hadn’t ever defeated him on Monsoon before, and only once by myself on other difficulties, so I knew it would be a challenge. I knew I would have to be very powered up in order to have a chance, so I shot, weaved, dodged, and climbed my way to stage 15 before deigning to challenge him.
One very unique advantage the engineer has over all other classes is that Mithrix does not pull the items from his turrets. So long as he is able to deploy them before phase four begins, they will continue to operate with a very full inventory even as the main character gets weaker and weaker. With the right mix of offensive and defensive items, they might make what is otherwise a nightmarish battle into a walk through the park—provided the engineer can survive the battle’s first three phases of course.
Let’s take a look at my loadout for this final match. I’ll try to explain the most salient items in my inventory and how they contributed to a stunning and rousing battle against this grueling end-boss.

Healing Items
First we have our friends the Bustling Fungus, and twenty of them to boot. This item creates a healing field if the character stands still. As my two turrets didn’t move, and I made sure to have them overlap, this means the three of us could triple the healing output so each of us received the equivalent of sixty funguses. This means that each of us were being healed for 143% of our total health every two seconds. Basically, if something couldn’t one-shot us, we were immortal.
Added to the mix were eight Infusions, which raised my maximum health by 100 each. A level 30 engineer has a base of 1260 health, so this pushed me well over the 2000 mark.
Four First-Aid Kits helped carry me through early levels, but their healing was not to be scoffed at, either. Every time I or my turrets took damage they would heal back 20% of their maximum health after a small delay.
Six copies of the Harvester’s Scythe provided additional healing, to the tune of 28 health per critical hit.
The legendary item Rejuvenation Rack doubles all healing received, which takes the above to stupidly high levels of absurdity.
Offensive Items
A major contributor to my damage per second was the stack of twenty-four Soldier’s Syringes, which boosted attack speed by a total of 360%, making both turrets fire 4.6 times per second with their 95 damage shots. But wait, a careful combination of Glass-Makers Lenses and the aforementioned scythes meant I had a 100% chance to critically hit with every shot, so each blast would do double damage.
Combining a 100% chance to critically hit with an absurd number of Predatory Instincts means that my rate of fire was increased by another 252% during the fight. Instead of the standard one shot per second my turrets were shooting more than seven times, each.
The AtG Missile Mk. 1 item, and my 23 stacks of it, has a 10% chance to fire on hit, dealing 6900% of the damage which triggered it. I’ll show the math down below, but rest assured that these missiles pack a punch. With my 52-Leaf Clover doubling the chance of an attack triggering the missiles, they were raining down almost non-stop.
The real star of the show however was N’kuhana’s Opinion, a legendary item which turns healing into damage output via flaming skulls. The math involved in sorting out how much damage the N’opinion does can be daunting, but again I’ll factor it all out below, if for no other reason than I myself am very interested. In fact, this item is the whole reason I stacked so many healing items above, to maximize my damage against the tough-as-nails boss.
And all of this is ignoring other offensive items which didn’t meaningfully contribute. It got too hard for me to calculate the bleed damage my Tri-Tip Daggers stacked, but adding 392 bleeds per second it had to be insane.
The Math
Head down to the bottom of this section for a summary version. Here I’ll be hoping to summarize all of the calculations that went into figuring out just how much damage my turrets were able to pour onto the boss during this climactic battle.
Level 30 Engineer: 1260 HP + 800 (Infusions) = 2060 total HP
Healing per second: 47.5% (Fungi) x2 (Rack) x3 (effect stacking) / 2 (rate of healing) = 142.5% = 2935.5 health
Healing from shots: 7.1 shots x28 health (Scythes) x2 (Rack) = 397.6 health / second
N’Kuhana’s Opinion calculations:
– Deals 25% of your maximum health in damage every time you are healed 10% of your maximum health (515 damage per 206 healed)
– Total of 3333.1 healing/second / 206 (10% health) * 515 (25% health) = 8332.75 damage per second
Standard Shot: 95.2 damage * 2 (always crit) * 7.1 shots/second = 1351.84 damage per second
AtG Missile Launcher: 95.2 damage * 2 (always crit) * 6900% (stacks) *7.1 shots/second * 19% (chance of firing) = 1772.26 damage per second
So now we get to the final calculations…
Turret Damage: [1351.84 + 1772.26 = 3124.1] x2 Turrets = 6248.2
N’Kuhana’s Opinion: [8332.75] x3 Stacks = 24998.25Total Damage Output: 31,246.45 per second
Definitely not bad for someone whose normal shots deal 95 damage once per second!
Putting it to the Test
I had a real, real good feeling about where my run was going so I decided to record my run up to and then the battle with Mithrix. Was all of this preparation and damage enough to take him down? Click the image below and find out for yourself! Thank you for following along this lengthy exploration of dealing damage in Risk of Rain 2 and I hope you are having as much fun and success with this game as I am!

September Edit
The mechanics of Mithrix have been adjusted in a post-release patch, including adding a period of invulnerability while he sucks up player items, as well as those from player-aligned followers like turrets and drones. He returns items more quickly upon being damaged, and a lower HP pool means the fight is often over more quickly, but it is a much more deadly affair than before; the patch largely invalidated the engineer’s overwhelming supremacy during the fight, but honestly I think that’s a good change by the developers.
All images taken in-game from Risk of Rain 2


